
您现在的位置是:首页 > PHP框架交流PHP框架交流
docker 部署thinkphp6 项目(strawberry) 基于官方镜像php nginx mysql部署
![]() 上善若水2024-01-12 13:56:50【PHP框架交流】
2814人已围观
上善若水2024-01-12 13:56:50【PHP框架交流】
2814人已围观
简介使用docker部署thinkphp6项目,这里采用php7.4+mysql5.7+nginx进行,每个服务为单独的一个容器,本人电脑不是专业版,采用centos虚拟机来运行docker,而非win
使用docker部署thinkphp6项目,这里采用php7.4+mysql5.7 +nginx进行,每个服务为单独的一个容器,本人电脑不是专业版,采用centos虚拟机来运行docker,而非windows下的docker.
官方镜像查询 https://hub.docker.com/_/mysql/tags
一、分别拉去php nginx mysql镜像
docker pull nginx
docker pull php:7.4-fpm
docker pull mysql:5.7
二、用拉去的容器创建镜像
1.先创建容器 先搭建
docker run -di --name=mysql5_7 -e MYSQL_ROOT_PASSWORD=root -p 3306:3306 mysql:5.7
我们先进去容器看看,尝试登录下mysql
docker ps
docker exec -it f11 /bin/bash
mysql -u root -p

Welcome to the MySQL monitor.  Commands end with ; or \g.
Your MySQL connection id is 13
Server version: 5.7.44 MySQL Community Server (GPL)

Copyright (c) 2000, 2023, Oracle and/or its affiliates.

Oracle is a registered trademark of Oracle Corporation and/or its
affiliates. Other names may be trademarks of their respective
owners.

Type 'help;' or '\h' for help. Type '\c' to clear the current input statement.

mysql>
2.接下来创建php 容器,并在容器里链接下mysql
docker run -di --name=php7_4 -p 9000:9000 -v /www/wwwroot:/www/wwwroot --link mysql5_7 php:7.4-fpm
—link mysql5_7方便直接通过host 直接用mysql5_7连接mysql
3.接下来创建ngix容器
docker run --name=nginx_latest -p 80:80 \
 -v /www/wwwroot:/www/wwwroot \
 -v /www/etc/nginx/conf.d:/etc/nginx/conf.d \
 -v /www/var/log/nginx:/var/log/nginx \
 --link php7_4 -di nginx
这里将conf.d 映射到本地目录,直接进去增加虚拟机就行。
查看运行状态能看到三个服务都启动后代表完成
三、准备thinkphp的代码
我们直接找到官方文档,手动来安装项目。https://doc.thinkphp.cn/v8_0/setup.html
docker ps
docker exec -it aa /bin/bash
cd /www/wwwroot
# 安装composer
composer create-project topthink/think tp6.com
正常是没有composer的,我们安装下
curl -sS https://getcomposer.org/installer | php
mv composer.phar /usr/local/bin/composer
composer --version
安装的时候居然发现php版本8才行,好吧,先安装个php6.1的版本吧
composer create-project topthink/think=6.1.x-dev tp6.com
报错说git也没有,害。算了,直接去机器准备项目算了 ,宿主机之前安装过lnmp一件包,php版本也是php7.4.直接没有项目直接用ftp传一个得了
麻蛋要修php.ini报的啥错,先不管,手动ftp传一个吧。
再我的window电脑随便拉去一个项目部署算了。这里我就以比人的tp6项目
https://gitee.com/qzxc_admin/strawberry
我们再本地搭建拉去下项目代码,并进入目录strawberry composer install windows电脑安装的也是php7.4所以直接放docker也能跑.
将strawberry 打包压缩包上传至网站www/wwwroot再解压会更快。mv strawberry strawberry.test重命名下文件夹!
cd /www/etc/nginx/conf.d
cp tp6.conf strawberry.test.conf

server
    {
        listen 80;
        #listen [::]:80;
        server_name strawberry.test www.strawberry.test;
        index index.html index.htm index.php default.html default.htm default.php;
        root  /www/wwwroot/strawberry.test/public;


        #error_page   404   /404.html;

        # Deny access to PHP files in specific directory
        #location ~ /(wp-content|uploads|wp-includes|images)/.*\.php$ { deny all; }

        location / {
        if (!-f $request_filename) {
                rewrite  ^(.*)$  /index.php?s=/$1  last;
            }
        }

        location ~ \.php$ {
            fastcgi_pass   php7_4:9000;
            fastcgi_index  index.php;
            fastcgi_param  SCRIPT_FILENAME  $document_root$fastcgi_script_name;
            include        fastcgi_params;
        }

        location ~ .*\.(gif|jpg|jpeg|png|bmp|swf)$
        {
            expires      30d;
        }

        location ~ .*\.(js|css)?$
        {
            expires      12h;
        }

        location ~ /\.
        {
            deny all;
        }

    }
再Windows电脑配置虚拟机host 192.168.160.133 strawberry.test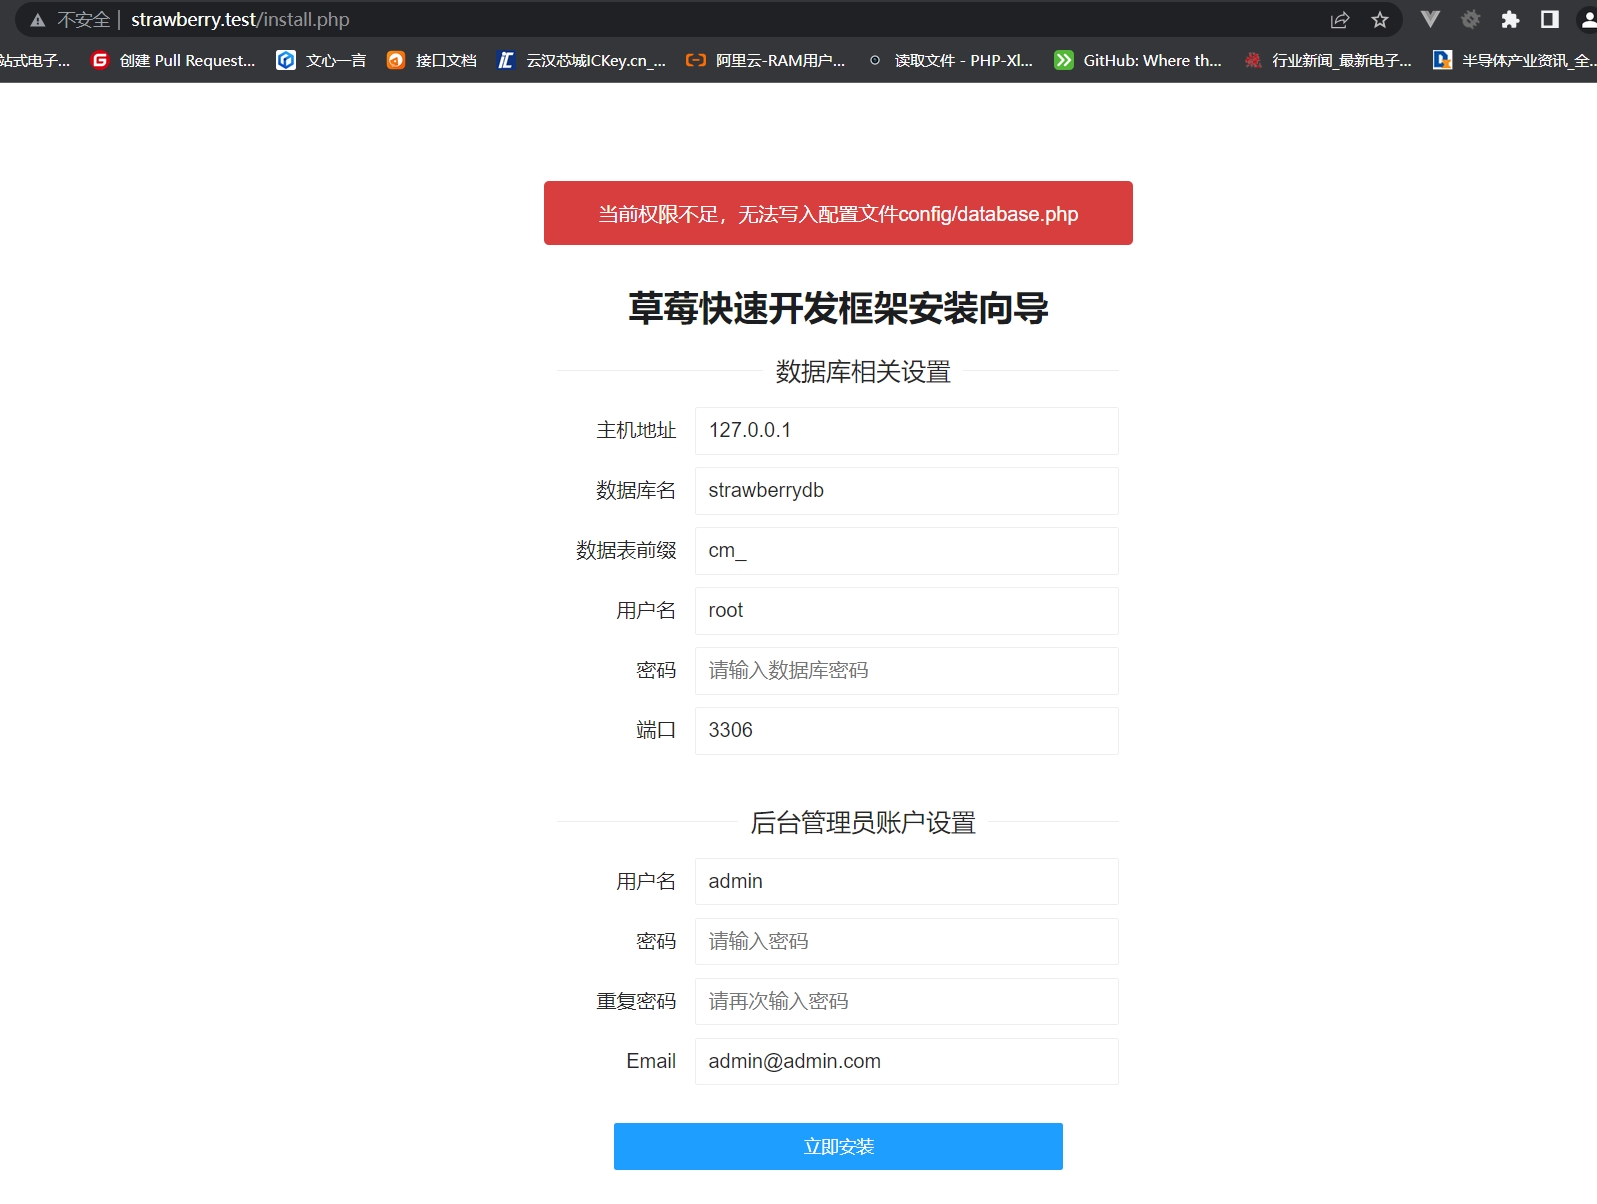
部署成功,准备配置mysql服务器。
五、配置项目
文件提示权限不足,我们进入容器,设置下config文件夹的权限。
docker exec -it 4b /bin/bash
cd  /www/wwwroot/strawberry.test/
chmod -R 777 config
继续填写运行,报错 Uncaught Error: Undefined class constant 'MYSQL_ATTR_INIT_COMMAND' in搜了下是php.ini中的mysql 扩展没有打开
我们进入php容器开启mysql扩展。
docker-php-ext-install mysqli
php -m
发现已经有mysqli扩展了
exit;
原以为事情解决了,发现没啥用。有人说是缺少pdo_mysql 再来一次,来到/usr/local/etc/php 只看到了conf.d php.ini-development php.ini-production
查看后需要自己复制一份重命名修改。
cp php.ini-production php.ini
docker里面没有vi无法修改手动安装vim
apt-get update
apt-get install vim
vim php.ini
在Linux中的vi、vim编辑模式中查找关键字的方法:
1、进入vi中,编辑模式中先按下键盘上”esc”跳转成命令输入模式
2、输入斜杠”/“,这时屏幕会跳转到底部,输入栏出现”/“
3、输入你需要查找的关键字,回车键
4、如果要继续查找下一个关键字,输入n
5、查找上一个关键字,输入N(大写)
删掉 extension=pdo_mysql前面的分号 保存
然后我们重启下php容器
docker ps
docker stop 51
docker start 51
重启发现依旧没有安装上扩展,进去容器安装扩展
docker-php-ext-install pdo_mysql
php -m #发现已经可以看到pdo_mysql了
我们创建php容器的时候已经 —link mysql5_7 这里填写地址的时候可以直接用mysql5_7代替mysql的ip进行连接。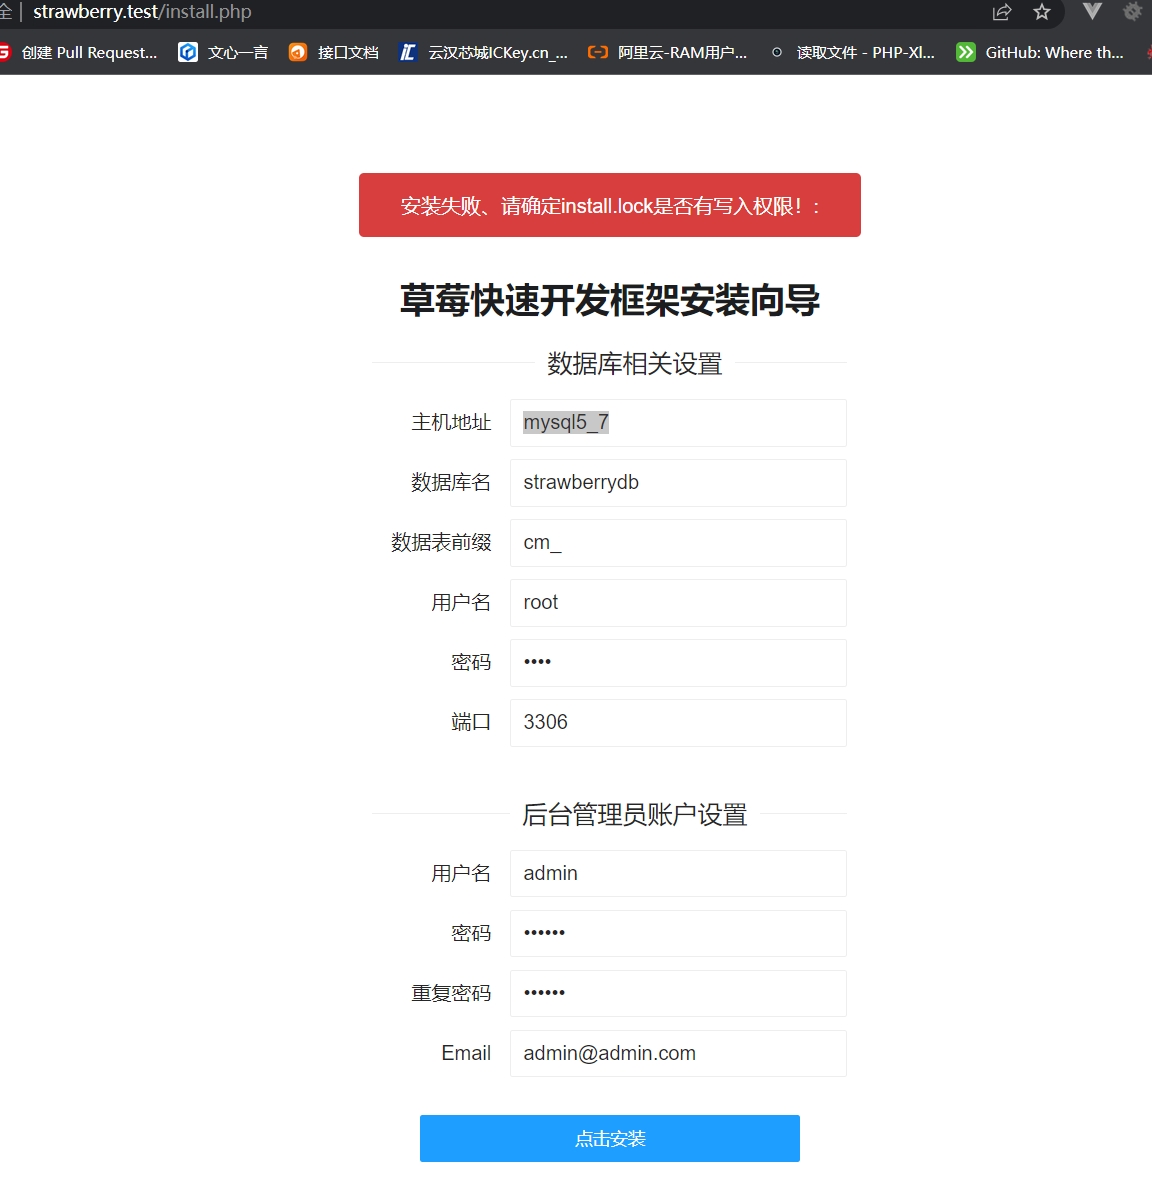
查询数据,发现数据表已经建立好,由于安装失败,我们需要手动将strawberry数据库先删除,否则会报数据库连接失败,其实是数据库已经存在的报错
docker exec -it 4b /bin/bash
cd  /www/wwwroot/strawberry.test/
chmod -R 777 public
chmod -R 777 runtime
页面提交,至此,成功安装上了thinkphp6的项目。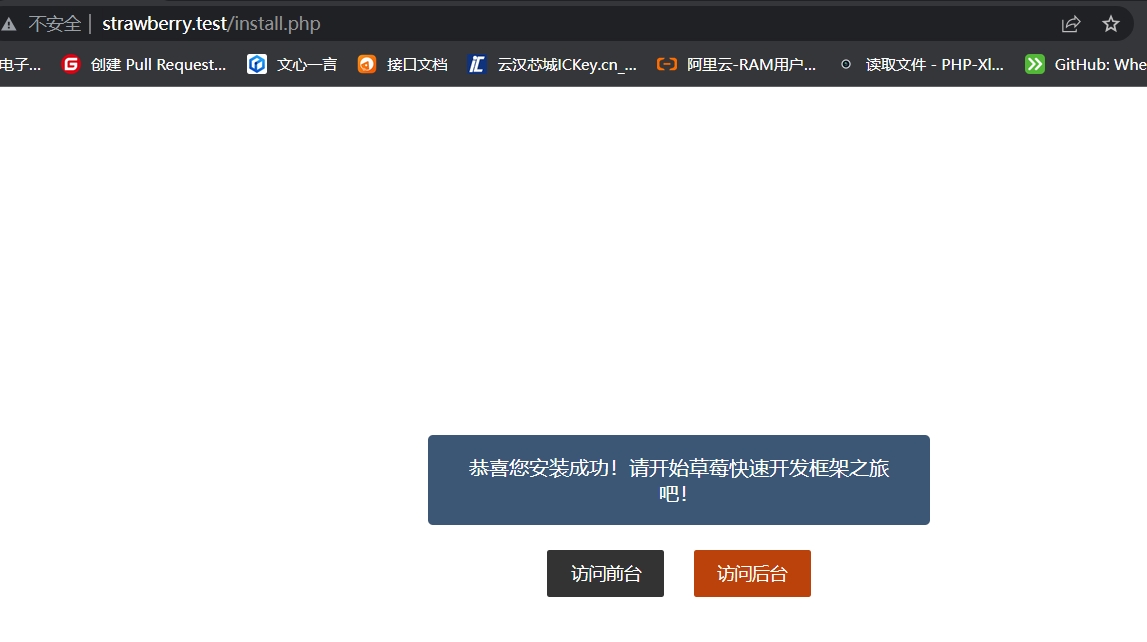
很多东西其实看起来很简单,多多少少会出现问题,出现问题,一步步解决,祝大家越来越强!
很赞哦! (1)


相关文章
随机图文

快乐段子(一)
1、第一次和女友啪完后我问她:“感觉老公怎么样?”女友很娇羞,回答说真大。我正高兴呢,又听她接着说:“针再大也是针。”2、对一个女孩表白:“我喜欢你很久了,你可以做我女朋友吗?”女孩羞涩的说:“你个傻
哄女孩子开心的幽默笑话!!
1.黑猩猩不小心踩到了长臂猿拉的大便,长臂猿温柔细心地帮其擦洗干净后它们相爱了。别人问起他们是怎么走到一起的?黑猩猩感慨地说:猿粪!都是猿粪啊!2.我说:“你是猪。”你说:“我是猪才怪!”从此我就叫你猪才怪。终于有一天,你忍不住当着众人的面对我吼道:“我不是猪才怪!”3.明天你醒来,枕边躺着一只蚊子,身边有一封遗书,上书:我奋斗了一晚,也没能刺破你的脸,你的脸皮厚得让我无颜活在这世上!主啊
mysql tinyint(1)tinyint(2)tinyint(3)tinyint(4)区别 详解tinyint()取值范围变化
一直对mysql中的整形存在误区,想当然的认为tinyint(1)的取值范围就是0-1之间,int()后面数字越大取值范围就越大,相当然每次还想想后面数字放多少合适,其实这都存在误区. 首先tinyi
phpstorm 新建php文件显示为文本 不提示php语法
phpstorm 新建php文件显示为文本 不提示php语法 跟显示txt文本文件一样 不提示任何语法 不变任何颜色 把文件删除 重新建还是一样 默认一文本方式打开 终于找到方法解决.1.首先在设置中