
您现在的位置是:首页 > PHP框架交流PHP框架交流
docker部署php项目 nginx+php docker搭建
![]() 上善若水2024-01-08 15:31:20【PHP框架交流】
1045人已围观
上善若水2024-01-08 15:31:20【PHP框架交流】
1045人已围观
简介1.拉取nginx镜像dockerpullnginx 2.拉取php-fpm这里我就选择php7.4版本的了dockerpullphp:7.4-fpm 3.先运行nginx试试配置有没有啥问
1.拉取nginx镜像
docker pull nginx
2.拉取php-fpm 这里我就选择php7.4版本的了
docker pull php:7.4-fpm
3.先运行nginx试试配置有没有啥问题
docker run --name my-niginx -p 80:80 nginx
# 参数说明:
--name nginx-test:容器名称。
-p 8080:80: 端口进行映射,将本地 8080 端口映射到容器内部的 80 端口。
-d nginx: 设置容器在在后台一直运行

这里我已经执行过,应为第一次执行的时候端口被占用了。停掉被占用的80端口的lnmpdocker ps -a 查看所有的镜像
docker run -di --name=my-nginx -p 80:80 nginx
cedac583b76af99758e0d7919c6373a736d10a01dc3620a02f682de5b66c123c
启动镜像 查看镜像发现
[root@localhost ~]# docker ps
CONTAINER ID   IMAGE     COMMAND                   CREATED         STATUS         PORTS     NAMES
cedac583b76a   nginx     "/docker-entrypoint.…"   3 minutes ago   Up 3 minutes   80/tcp    my-nginx
执行命令 curl 127.0.0.1
[root@localhost ~]# curl 127.0.0.1
curl: (7) Failed connect to 127.0.0.1:80; 拒绝连接
[root@localhost ~]#
连接拒绝
进入容器再试试
[root@localhost ~]# docker exec -it cedac583b76a /bin/bash
root@cedac583b76a:/# curl 127.0.0.1:80
<!DOCTYPE html>
<html>
<head>
<title>Welcome to nginx!</title>
<style>
html { color-scheme: light dark; }
body { width: 35em; margin: 0 auto;
font-family: Tahoma, Verdana, Arial, sans-serif; }
</style>
</head>
<body>
<h1>Welcome to nginx!</h1>
<p>If you see this page, the nginx web server is successfully installed and
working. Further configuration is required.</p>

<p>For online documentation and support please refer to
<a href="http://nginx.org/">nginx.org</a>.<br/>
Commercial support is available at
<a href="http://nginx.com/">nginx.com</a>.</p>

<p><em>Thank you for using nginx.</em></p>
</body>
</html>
容器内可以访问,证明配置有问题,容器内的80端口未和宿主机端口映射,配置容器端口80绑定宿主机80端口
[root@localhost ~]# docker container stop cedac583b76a
cedac583b76a
#停止删除容器
[root@localhost ~]# docker rm cedac583b76a
cedac583b76a
# 重新运行nginx
docker run -di --name=my-nginx -p 80:80 nginx
进入容器docker exec -it 501b79900a11 /bin/bash 创建目录作为网站的项目放置的位置 mkdir -p /www/wwwroot 退出容器 并将容器的的/www/wwwroot 挂载宿主机目录/www/wwwroot。
# 先退出宿主机 同样创建 /www/wwwroot 我之前装了lnmp所以是有这个目录的
mkdir -p /www/wwwroot
# 查看容器id
docker ps
停止容器
docker stop 501b79900a11
# 给容器增加挂载目录
docker run -v /www/wwwroot:/www/wwwroot  --name=my-nginx -p 80:80 nginx
`
参考网上的方法,这里需要停止docker并关闭去修改配置文件?这个就极其不合理了,万一其他容器不能停止,关闭docker修改配置文件不就整个都瘫痪了吗。
利用docker run是新建一个docker容器,我运行报冲突了,创建新的容器运行当然也不对。
docker run --mount type=bind,source=/www/wwwroot,target=/www/wwwroot nginx --name=my-nginx
AI给的命令试了也不对,害,只能把原容器删除了,重新创建容器的时候就指定好目录映射了
docker run -di -v /www/wwwroot:/www/wwwroot --name=my-nginx -p 80:80 nginx
直接运行后发现容器里已经有了已经有了www/wwwroot这个目录,并且里面的内容正是我们的宿主机器上的内容。
3.接下来就是启动php-fpm 默认是9000的端口,这个不需要啥配置直接运行就可以。
docker run -di --name=my-php:7.4 -p 9000:9000 php:7.4-fpm
进入容器docker exec -it 10c04e294219 /bin/bash 进入目录/etc/nginx我们查看配置文件cat nginx.conf 发现配置文件有导入include /etc/nginx/conf.d/*.conf;下所有目录 我们只需再改目录创建并修改我们的网站配置文件就可以。发现容器里没有安装vi bash: vi: command not found
好吧,那就再重新来 把nginx /etc/nginx/conf.d 这里我犯过错我想直接挂载容器内的nginx目录由于子目录的目录还有目录 挂载不成功那就直接挂载conf.d 成功。
# 停止删除之前的容器 重新运行一个nginx 容器 配置网站目录和nginx目录 方便管理我就随意放进www目录了
docker run -di -v /www/wwwroot:/www/wwwroot -v /www/etc/nginx/conf.d:/etc/nginx/conf.d -p 80:80  --name=my-nginx nginx
我们去phpstudy里面见一个网站,找到D:\phpstudy_pro\Extensions\Nginx1.15.11\conf\vhosts复制里面的配置文件进行修改
server {
        listen        80;
        server_name  helloworld.com;
        root   "/www/wwwroot/helloworld.com";
        location / {
            index index.php index.html error/index.html;
            include /www/wwwroot/helloworld.com/nginx.htaccess;
            autoindex  off;
        }
        location ~ \.php(.*)$ {
            fastcgi_pass   127.0.0.1:9000;
            fastcgi_index  index.php;
            fastcgi_split_path_info  ^((?U).+\.php)(/?.+)$;
            fastcgi_param  SCRIPT_FILENAME  $document_root$fastcgi_script_name;
            fastcgi_param  PATH_INFO  $fastcgi_path_info;
            fastcgi_param  PATH_TRANSLATED  $document_root$fastcgi_path_info;
            include        fastcgi_params;
        }
}
去宿主机创建/www/wwwroot创建helloworld.com 目录并在目录下建立 nginx.htaccess文件
mkdir -p /www/wwwroot/helloworld.com
cd /www/wwwroot/helloworld.com
touch nginx.htaccess
# vim index.php
<?php
phpinfo();
然后进去nginx容器 重启nginx使配置生效
docker ps
docker exec -it e2fc1f23736e /bin/bash
# 再宿主机创建的文件容器内也是同步存在的
cat /etc/nginx/conf.d/helloworld.com.conf
# 检查配置文件是否正常
nginx -t
nginx -s reload
哈哈哈过不奇然,无法正常访问。普通的html是可以正常访问php文件报502,检查了下是127.0.0.1:9000的问题,容器的9000端口压根没有配置,转发过去当然无法处理。修改成宿主机ip 发现容器内压根无法访问到宿主机ip,还是看看人家怎么解决的吧。
docker run -di -v /www/wwwroot:/www/wwwroot
                        -v /www/etc/nginx/conf.d:/etc/nginx/conf.d
                        -v /www/var/log/nginx:/var/log/nginx
                        -p 80:80
                        --name=my-nginx nginx
                        --link my-php7.4:php7.4
—link: 把 my-php 容器的网络并入 nginx
注意:PHP和Nginx容器存放文件的目录必须一致,才能访问,不然会找不到文件。
然后我决定推到重做:
docker run -di  --name=php7_4 -p 9000:9000 -v /www/wwwroot:/www/wwwroot  php:7.4-fpm

docker run --name=my-nginx -p 80:80 \
 -v /www/wwwroot:/www/wwwroot \
 -v /www/etc/nginx/conf.d:/etc/nginx/conf.d \
 -v /www/var/log/nginx:/var/log/nginx \
 --link php7_4 -di nginx
宿主机已经绑定过容器的直接新建一个default.conf
server
    {
        listen 80;
        #listen [::]:80;
        server_name helloworld.com www.helloworld.com localhost;
        index index.html index.htm index.php default.html default.htm default.php;
        root  /www/wwwroot/helloworld.com;


        #error_page   404   /404.html;

        # Deny access to PHP files in specific directory
        #location ~ /(wp-content|uploads|wp-includes|images)/.*\.php$ { deny all; }

       location ~ \.php$ {
            fastcgi_pass   php7_4:9000;
            fastcgi_index  index.php;
            fastcgi_param  SCRIPT_FILENAME  $document_root$fastcgi_script_name;
            include        fastcgi_params;
        }

        location ~ .*\.(gif|jpg|jpeg|png|bmp|swf)$
        {
            expires      30d;
        }

        location ~ .*\.(js|css)?$
        {
            expires      12h;
        }

        location ~ /\.
        {
            deny all;
        }

    }
php7_4这里是php宿主机的ip的别名
docker ps -a
docker exec -it 1a /bin/bash
cat /etc/hosts
#host的内容
127.0.0.1    localhost
::1    localhost ip6-localhost ip6-loopback
fe00::0    ip6-localnet
ff00::0    ip6-mcastprefix
ff02::1    ip6-allnodes
ff02::2    ip6-allrouters
172.17.0.2    php7_4 65faa49a6d3d
172.17.0.3    1afee67fe529
根据配置文件 我们去/www/wwwroot 建立一个 helloworld.com 目录,建立一个index.php 文件,里面<?php phpinfo(); 保存。
然后去浏览器访问虚拟机宿主机的。能正常打印出php的信息就算成功了。
去host把虚拟机ipt填进去,增加一条记录192.168.160.133 helloworld.com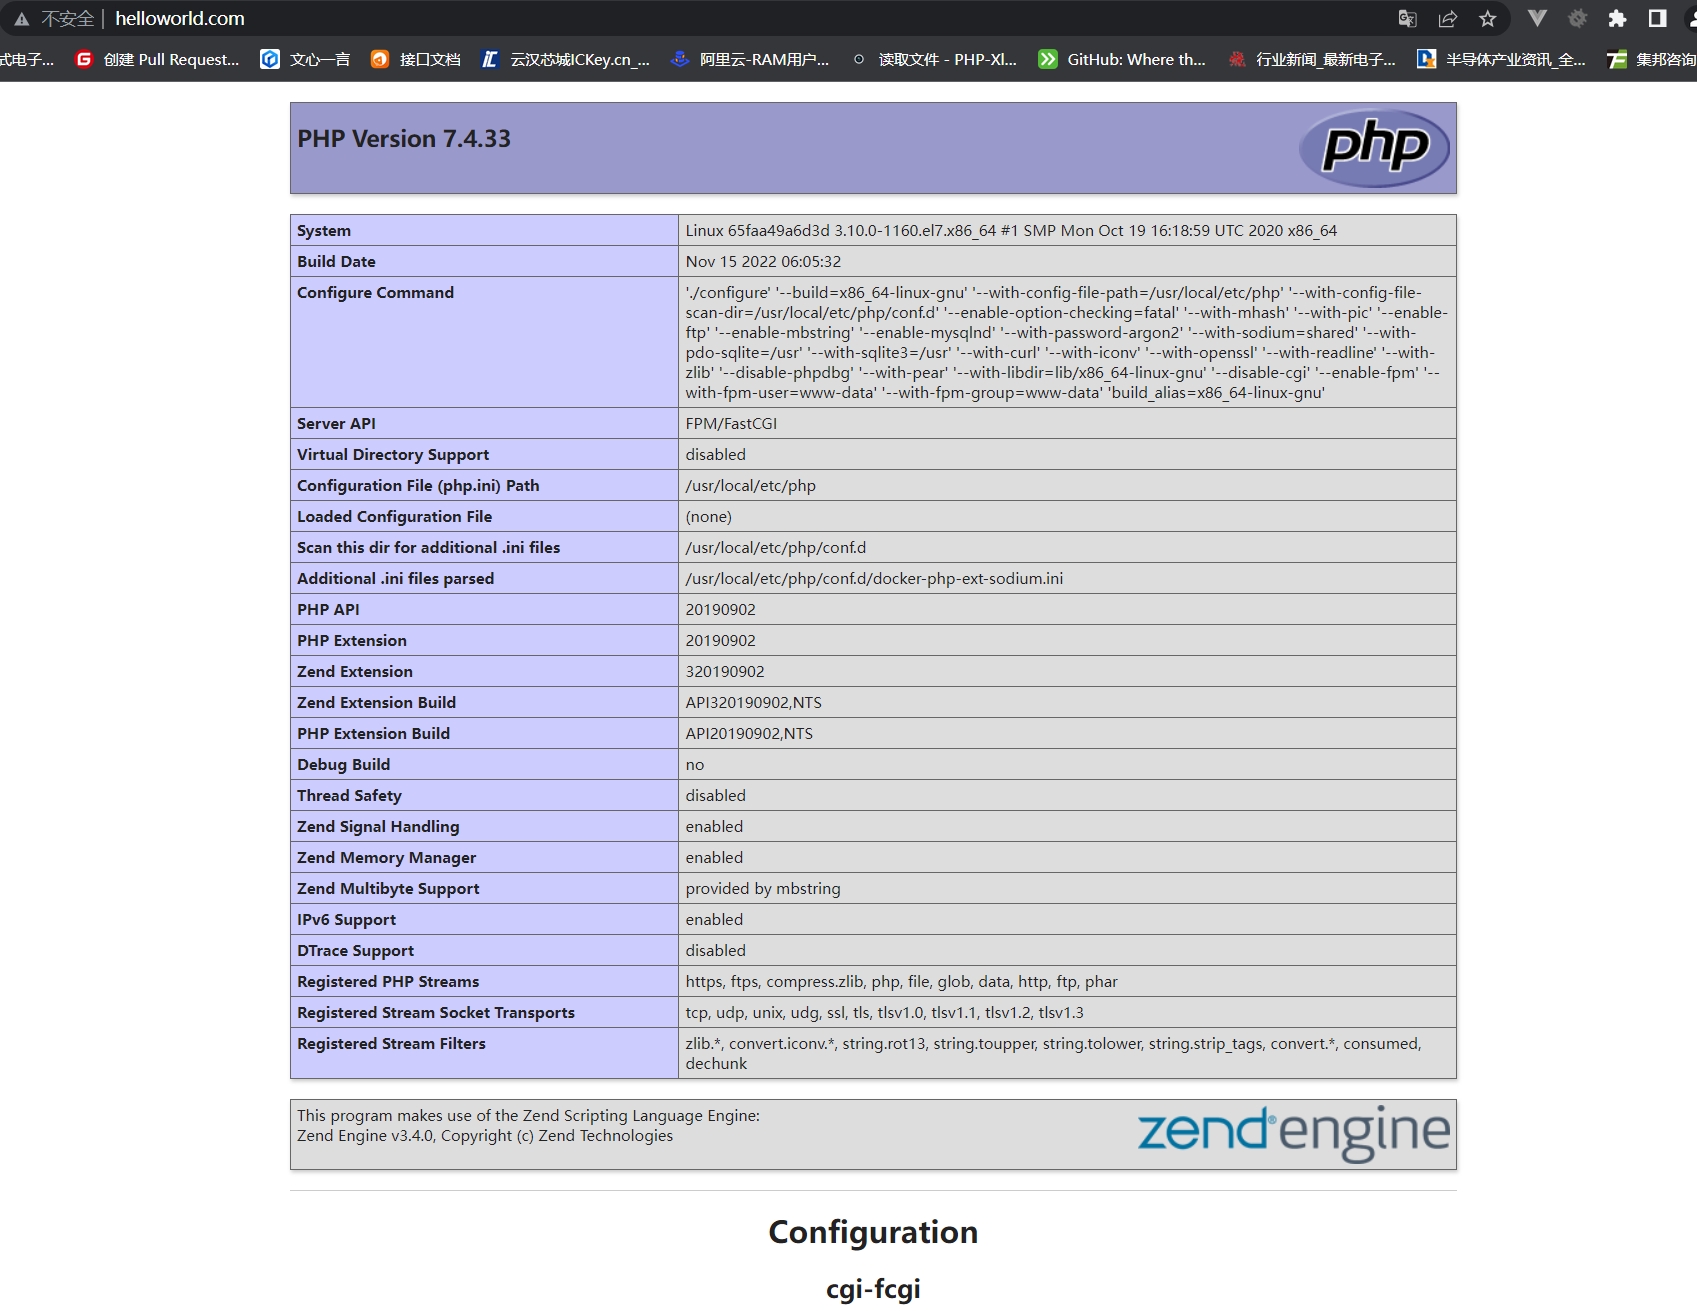
很赞哦! (0)


相关文章
随机图文

经典五条笑话,笑到肚子疼!
1.老夫妇去拍照,摄影师问:“大爷,您是要侧光,逆光,还是全光?',大爷腼腆的说:“我是无所谓,能不能给你大妈留条裤衩?'2.两个饺子结婚了,送走客人后新郎回到卧室,竟发现床上躺着一个肉丸子!新郎大惊,忙问新娘在哪?肉丸子害羞的说:讨厌,人家脱了衣服你就不认识啦!3.四只老鼠吹牛:甲:我每天都拿鼠药当糖吃;乙:我一天不踩老鼠夹脚发痒;丙:我每天不过几次大街不踏实;丁:时间不早了,回家抱猫去
切换php版本执行命令行 不更改环境变量切换php版本执行命令
由于不同的php版本互相不兼容,频繁更换环境变量的path变量过于麻烦,不更改环境变量切换php版本执行命令,直接在php nts 目录下执行php命令方法.当前我有个为php5.3环境的项目与一个p
SpringBoot 使用Test调试项目 idea快速创建Junit test测试类
我们在SpringBoot项目中经常会频繁使用到项目调试整个项目启动起来调试十分繁琐,用idea可以快捷帮助我们创建测试类快速进行测试.首先,我们在需要测试的方法或者类文件上右键,选择goto->T
幽默笑话:学生们特别喜欢音乐史课,因为任课的音乐老师非常幽默
1、去相亲,正和女方聊得如火如荼,一个三岁左右的女孩走到我身旁,怯怯的叫了声爸爸。我惊出一身冷汗,赶紧同女方解释:“她不是我女儿!”女方淡淡的道:“我知道,她是我女儿!”2、我上大一的时候的事。刚刚军训完,上大学语文。老师是一个中年妇女,上课可认真了,有一次她正讲课,教室后排的同学都在说话,老师大叫一声:“后面的朋友”话刚落音,不知道哪个二货接了句:“你们好吗?”全班同学都笑趴了。3、早上